Makeup Baking: What is it and how to do it?
In this post we are going to tell you everything you need to know about makeup baking, what it is, what it is for and step-by-step instructions on how to apply it at home.

What is makeup baking?
As the name suggests, makeup baking is like cooking makeup. Makeup baking is a makeup technique originally used by Drag Queens, but which has recently become popular among celebrities and makeup artists.
It consists of blurring out and eliminating any “imperfections” such as wrinkles, expression lines, bags under our eyes or blotches, by using corrector and concentrated translucent powder, so that our skin looks completely smooth and uniform.
What is it for?
Makeup baking is ideal for oily and mixed skins, since it prevents any unsightly shine and enhances the look of our skin. Furthermore, it is the perfect technique to conceal open pores, which tend to be a common problem for people with oily or mixed skin, and as we get older they tend to be more obvious due to the loss of collagen and elastin. This technique leads to a smooth, matt finish that minimises the shine produced by oily skins.
It doesn’t matter if you have spots, redness or blotches, the baking technique covers them all up as if your face were a painter’s canvas.
Nevertheless, this technique is not recommended for dry skins, because your skin could end up being too dull and leathery looking.
Makeup baking technique

The aim of makeup baking is to apply a fairly thick coat of makeup to cover up any imperfections on your face and achieve an impeccable finish. For this technique you will need some moisturising cream, foundation, corrector, translucent powder and a makeup brush.
The translucent powder absorbs the oil, and this is what gives our skin that dazzling look. It will depend though on the amount of powder our skin can retain, which is why we need to leave it to work for at least 10 minutes.
We need to make sure we get rid of any excess so that our face doesn’t look too white, which would be too obvious in photographs, for example.
On the other hand, this technique requires more time, so we don’t recommend applying it when you are in a rush. Neither is it recommended for daily use since we will use a fair amount of corrector in addition to the translucent powder, and therefore it prevents our skin from breathing. It is ideal for special occasions though, on those days when we want to show off our perfect, dazzling skin.
Makeup baking step-by-step
Step 1: Hydration
The first thing to do is apply moisturising cream, particularly around our eyes, since this is one of the areas where there are most small wrinkles and blotches. Use a moisturiser suitable for your skin, or even a face oil.
Step 2: Applying foundation
Now apply a liquid foundation makeup to your face, as you would do normally. Choose a light formula which spreads easily and is long-lasting. Use a brush or sponge to spread it all over your face to achieve a more professional finish.
Step 3: Applying corrector
This is where the characteristic baking process starts. Apply some corrector to the areas where you want to conceal the “imperfections”, such as under your eyes to hide the bags and any spots, marks or blotches on your skin. You need to apply it to the parts of your skin where natural light reaches. This is normally your forehead, cheekbones, the bridge of your nose and chin. Choose a corrector with a colour tone that is lighter than the tone of your skin. For a more perfect finish, spread it using a brush or sponge until it blends in perfectly with the rest of your skin.
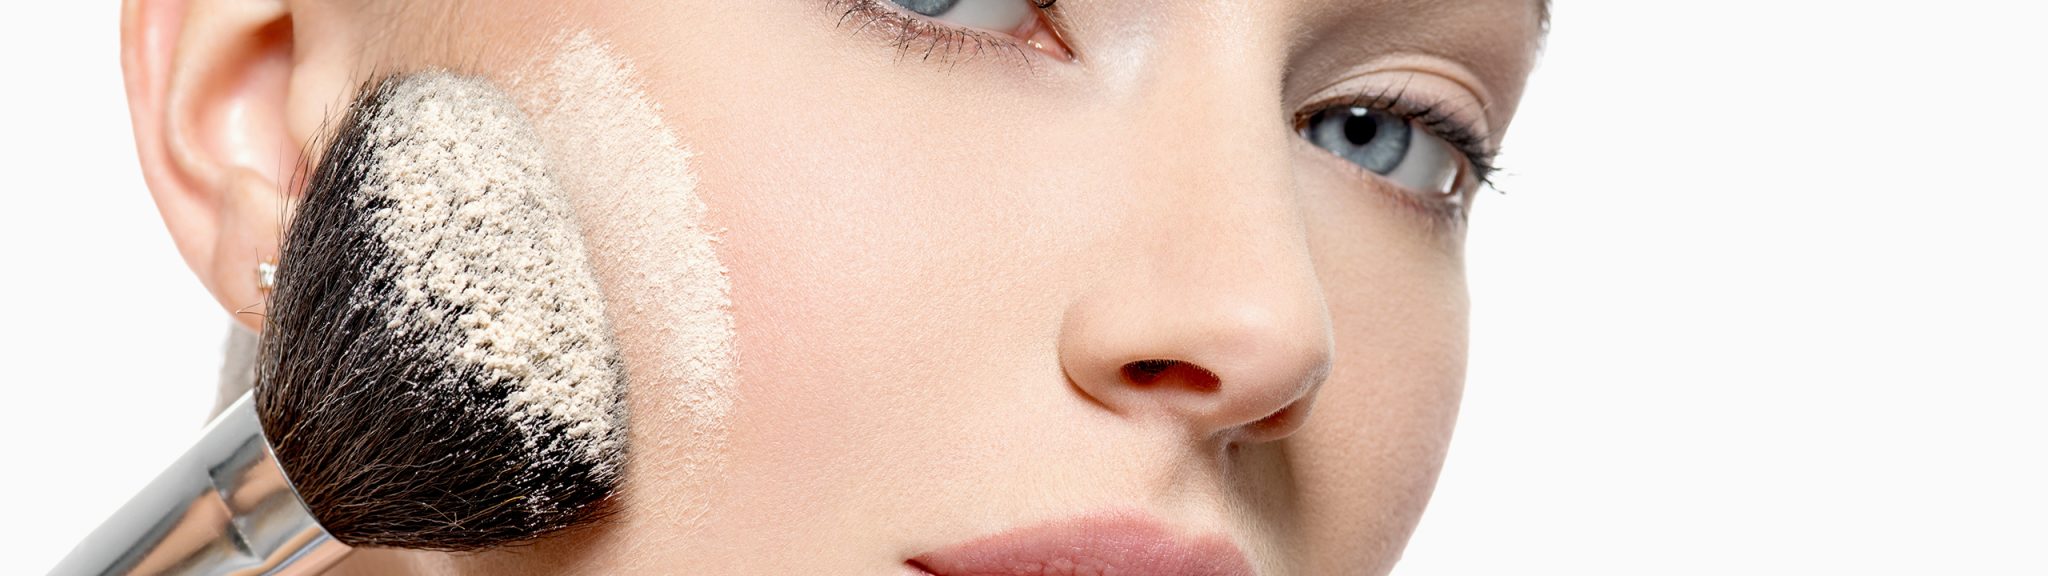
Step 4: Applying translucent powder
Now is the time to apply a thick layer of translucent powder to the same places where we applied the corrector earlier (around our eyes, temples, top of our cheekbones, etc.), but unlike with other techniques, we do not spread it or blend it. We now leave it as it is to work for approximately 10 to 15 minutes. The heat of your skin will help the powder and corrector to mix and blend together to “fill in” and cover any imperfections on your face. It is important to make sure you choose a mild, transparent translucent powder which you will be able to clean off easily later. You can also apply it to your forehead, but avoid any areas with a lot of wrinkles, because it will only further accentuate them.
Step 5: Remove any excess makeup
After leaving it on for 10 to 15 minutes, remove any excess powder using a thick brush so that the result is as natural as possible.
What do you think about?
Share comments, opinions and tricks with the Community